
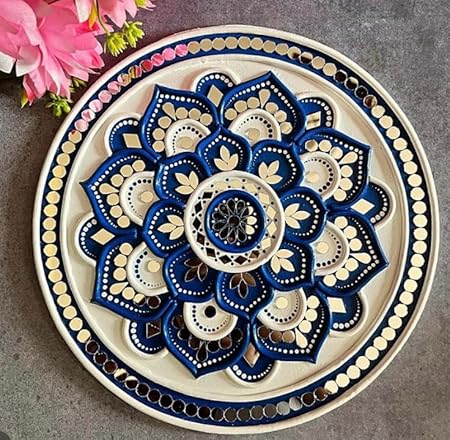
Lippan Art
Creating Lippan Art with Mouldit clay is a fun and creative process! Traditionally, Lippan Kaam is a mural craft from Kutch, Gujarat, made using clay and mirrors. Using Mouldit (an air-dry epoxy clay), you can recreate this art with a modern twist.
Here’s a step-by-step guide for making Lippan Art with Mouldit clay:
Materials Needed:
- Mouldit clay (epoxy clay)
- Hard base (MDF board or canvas board)
- Fevicol / White glue
- Rolling pin (optional)
- Mirror pieces (assorted shapes)
- Acrylic paints
- Palette knife / Clay tools / Toothpick
- Sandpaper (optional, for smooth finishing)
- Varnish (optional, for sealing)
- Water and cloth for cleanup
Step-by-Step Process:
1. Prepare the Base
- Take an MDF board or canvas board as your base.
- Paint it with a base coat (usually white or earthy tones). Let it dry.
- You can lightly sand the surface for smoothness if needed.
2. Design Your Layout
- Sketch the basic design lightly with a pencil.
- Traditional Lippan designs are geometric and symmetrical. Floral and mandala patterns are also popular.
3. Prepare the Mouldit Clay
- Mouldit comes in two parts: resin and hardener. Mix equal parts thoroughly until it’s a uniform color.
- You’ll have about 1-2 hours of working time before it hardens.
4. Create the Clay Coils / Shapes
- Roll the mixed Mouldit into thin coils or shape it as needed.
- You can make small motifs, borders, and detailing with your hands or use clay tools.
5. Stick the Clay on the Base
- Apply a little Fevicol where you want to stick the clay.
- Arrange your clay coils or motifs over your sketched design, pressing them gently to stick.
- 6. Add Mirrors
- Stick mirrors in between the clay work while it’s still soft or after the clay has dried (using glue).
- Play with different mirror shapes—rounds, squares, diamonds!
7. Let It Dry
- Allow the Mouldit clay to dry completely (usually overnight).
8. Painting
- Once dry, paint your Lippan Art using acrylic paints.
- Traditional Lippan art is often in earthy tones like white, brown, beige, but you can get creative with colors!
9. Finishing Touches
- If you like, apply a coat of varnish to protect the paint and give it a shine.
- Clean the mirrors with a damp cloth if they got paint on them.
- Tips:
- Keep water handy to smoothen the clay and your fingers.
- If you’re new to Lippan art, start with simple designs and work your way up.
- You can use stencils for intricate and symmetrical designs.